 vueBase
# Vue 3 介绍
# 为什么要学习 vue 3

为什么要学vue3,理由如下:
- Vue 是国内最火的前端框架
- Vue 3 于 2022 年 2 月 7 日星期一成为新的默认版本!
- 原文链接:https://blog.vuejs.org/posts/vue-3-as-the-new-default.html
- 中文链接:https://zhuanlan.zhihu.com/p/460055155
- Vue3 性能更高,体积更小
- Vue3 在经过一年的迭代后,越来越好用
官方文档:
- vue3官方文档:https://vuejs.org/
- vue3中文文档:https://v3.cn.vuejs.org/
目前已支持 vue3 的UI组件库:
element-plus (PC组件库)
https://element-plus.gitee.io/#/zh-CN
Element Plus,一套为开发者、设计师和产品经理准备的基于 Vue 3.0 的桌面端组件库。
vant (移动端组件库)
https://vant-contrib.gitee.io/vant/v3/#/zh-CN
轻量、可靠的移动端 Vue 组件库。
Vant 是有赞前端团队开源的移动端组件库,于 2016 年开源,已持续维护 4 年时间。
目前 Vant 已完成了对 Vue 3.0 的适配工作,并发布了 Vant 3.0 版本
ant-design-vue (PC组件库)
https://antdv.com/docs/vue/introduce-cn/
ant-design-vue 是 Ant Design 的 Vue 实现,组件的风格与 Ant Design 保持同步
# Vue3 动机 和 新特性
Vue3 设计理念 https://vue3js.cn/vue-composition/
动机与目的:
更好的逻辑复用 与 代码组织 (composition组合式api)
optionsAPI(旧) => compositionAPI(新), 效果: 代码组织更方便了, 逻辑复用更方便了 非常利于维护!!
更好的类型推导 (typescript支持)
vue3 源码用 ts 重写了, vue3 对 ts 的支持更友好了 (ts 可以让代码更加稳定, 类型检测! )
vue3新特性:
数据响应式原理重新实现 (ES6 proxy 替代了 ES5 的 Object.defineProperty)
解决了: 例如数组的更新检测等bug, 大大优化了响应式监听的性能
(原来检测对象属性的变化, 需要一个个对属性递归监听) proxy 可以直接对整个对象劫持
虚拟DOM - 新算法 (更快 更小)
提供了composition api, 可以更好的逻辑复用
模板可以有多个根元素
源码用 typescript 重写, 有更好的类型推导 (类型检测更为严格, 更稳定)
...
小结: vue3 性能更高, 体积更小, 更利于复用, 代码维护更方便
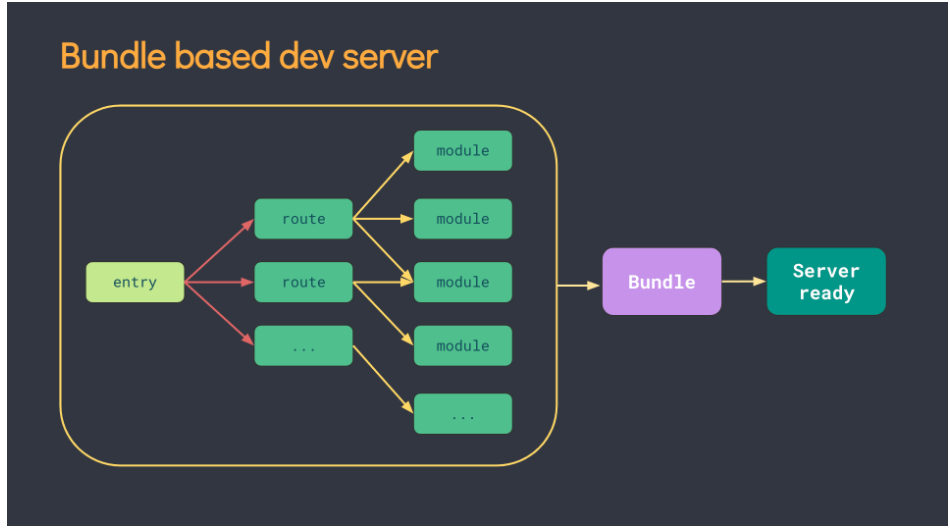
# Vite 的使用

# vite介绍
Vite 官方文档:https://cn.vitejs.dev/
Vite(法语意为 "快速的",发音 /vit/,发音同 "veet")是一种新型前端构建工具
优势
- 💡 极速的服务启动,使用原生 ESM 文件,无需打包
- ⚡️ 轻量快速的热重载,始终极快的模块热重载(HMR)
- 🛠️丰富的功能,对 TypeScript、JSX、CSS 等支持开箱即用
- 📦等等
# 为什么选 Vite ?
传统方式
- 基于打包器的方式启动,必须优先抓取并构建你的整个应用,然后才能提供服务。
- 更新速度会随着应用体积增长而直线下降。
vite 方式
- Vite 以 原生 ESM (opens new window) 方式提供源码。这实际上是让浏览器接管了打包程序的部分工作。
- Vite 只需要在浏览器请求源码时进行转换并按需提供源码。
- 根据情景动态导入代码,即只在当前屏幕上实际使用时才会被处理。

问题小结:
- Vite 是否需要先打包才能提供服务?
- 使用webpack能否创建vue3的项目?
温馨提示:
- webpack 的入口是一个 js 文件,先根据入口 js 文件,构建打包项目,在运行服务器。
- Vite 的入口文件是一个 html 文件,先直接启动服务器运行 html 文件,在通过 http 请求加载源码。
# Vite 的基本使用
目标:能够使用vite创建一个vue3的项目
(1)使用vite创建项目
npm create vite
# or
yarn create vite
2
3
(2)输入项目名字,默认为vite-project

(3)选择创建的项目类型,选择vue即可

(4)选择创建的vue项目类型, 选 vue-ts

(5)启动项目

vite快捷使用
如果想要快速创建一个vue3项目,可以使用如下命令
- 创建普通vue项目
yarn create vite vite-demo --template vue
- 创建基于ts模板的项目
yarn create vite vite-demo-ts --template vue-ts
# vscode 插件说明
- vue2中需要安装插件
Vetur,可以实现组件高亮。但是vue3的一些语法在vetur中报错。 - vue3中需要安装插件
Volar,提供了更加强大的功能,插件和Vetur会出现冲突。 - 所以,使用功能vue3,需要禁用
vetur插件,安装Volar插件。 Volar共需要安装两个插件,第二个提供Volar TypeScript支持。
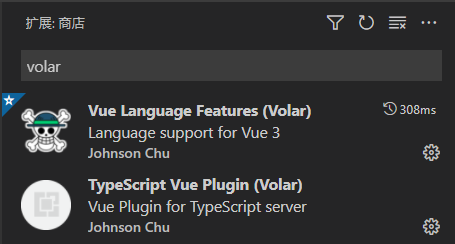
🚨 注意
- Vue3 开发需要禁用 Vetur 插件。
# Vue3.0项目介绍
任务目标:掌握 vue3 的项目目录结构
精简 src 下的文件和代码
创建 App.vue
<template>
  <div>我是App组件</div>
</template>
2
3
- 创建 main.ts 文件
import { createApp } from 'vue'
import App from './App.vue'

createApp(App).mount('#app')
2
3
4
# 组合式API
# composition API vs options API
vue2 采用的就是
optionsAPI(1) 优点:
易于学习和使用, 每个代码有着明确的位置 (例如: 数据放 data 中, 方法放 methods中)(2) 缺点: 相似的逻辑, 不容易复用, 在大项目中尤为明显
(3) 虽然 optionsAPI 可以通过mixins 提取相同的逻辑, 但是也并不是特别好维护
vue3 新增的就是
compositionAPI(1) compositionAPI 是基于 逻辑功能 组织代码的, 一个功能 api 相关放到一起
(2) 即使项目大了, 功能多了, 也能快速定位功能相关的 api
(3) 大大的提升了
代码可读性和可维护性vue3 推荐使用 composition API, 也保留了options API
即就算不用 composition API, 用 vue2 的写法也完全兼容!!
问题小结:
optionsAPI的优缺点是什么?
vue3 新增的 compositionAPI 有什么特征? 有什么优势?
# 体验 composition API
需求: 鼠标移动显示鼠标坐标 x, y

options API 版本
<template>
<div>当前鼠标位置</div>
<div>x: {{ mouse.x }}</div>
<div>y: {{ mouse.y }}</div>
<div>当前点击次数:{{ count }}</div>
<button @click="add">点击</button>
</template>
<script lang="ts">
import { defineComponent } from 'vue'
export default defineComponent({
// vue2 中采用的是 options API
// 常见的配置项: data created methods watch computed components
data() {
return {
mouse: {
x: 0,
y: 0,
},
count: 0,
}
},
mounted() {
document.addEventListener('mousemove', this.move)
},
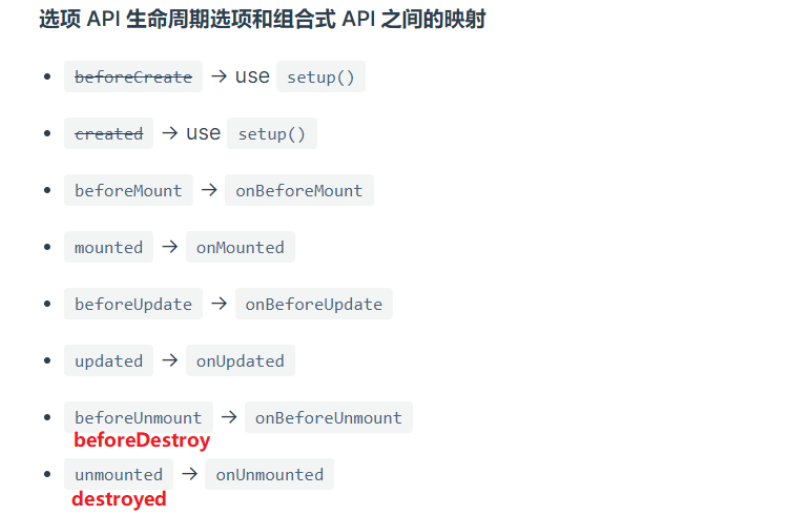
// 🚨注意:Vue3 把 destroyed 重命名为 unmounted
unmounted() {
document.removeEventListener('mousemove', this.move)
},
methods: {
move(e: MouseEvent) {
this.mouse.x = e.pageX
this.mouse.y = e.pageY
},
add() {
this.count++
},
},
})
</script>
2
3
4
5
6
7
8
9
10
11
12
13
14
15
16
17
18
19
20
21
22
23
24
25
26
27
28
29
30
31
32
33
34
35
36
37
38
39
40
41
42
composition API 版本
<template>
  <div>当前鼠标位置</div>
  <div>x: {{ mouse.x }}</div>
  <div>y: {{ mouse.y }}</div>
  <div>当前点击次数:{{ count }}</div>
  <button @click="add">点击</button>
</template>

<script lang="ts">
import { defineComponent, onMounted, onUnmounted, reactive, ref } from 'vue'

export default defineComponent({
  setup() {
    const count = ref(0)
    const add = () => {
      count.value++
    }

    const mouse = reactive({
      x: 0,
      y: 0,
    })

    const move = (e: MouseEvent) => {
      mouse.x = e.pageX
      mouse.y = e.pageY
    }
    onMounted(() => {
      document.addEventListener('mousemove', move)
    })
    onUnmounted(() => {
      document.removeEventListener('mousemove', move)
    })
    return {
      count,
      add,
      mouse,
    }
  },
})
</script>
2
3
4
5
6
7
8
9
10
11
12
13
14
15
16
17
18
19
20
21
22
23
24
25
26
27
28
29
30
31
32
33
34
35
36
37
38
39
40
41
42
抽离逻辑
<template>
  <div>当前鼠标位置</div>
  <div>x: {{ mouse.x }}</div>
  <div>y: {{ mouse.y }}</div>
  <div>当前点击次数:{{ count }}</div>
  <button @click="add">点击</button>
  <div @mousemove=""></div>
</template>

<script lang="ts">
function useMouse() {
  const mouse = reactive({
    x: 0,
    y: 0,
  })
  const move = (e: MouseEvent) => {
    mouse.x = e.pageX
    mouse.y = e.pageY
  }
  onMounted(() => {
    document.addEventListener('mousemove', move)
  })
  onUnmounted(() => {
    document.removeEventListener('mousemove', move)
  })
  return mouse
}

function useCount() {
  const count = ref(0)
  const add = () => {
    count.value++
  }
  return {
    count,
    add,
  }
}
import { defineComponent, onMounted, onUnmounted, reactive, ref } from 'vue'

export default defineComponent({
  setup() {
    const mouse = useMouse()
    const { count, add } = useCount()
    return { count, add, mouse }
  },
})
</script>
2
3
4
5
6
7
8
9
10
11
12
13
14
15
16
17
18
19
20
21
22
23
24
25
26
27
28
29
30
31
32
33
34
35
36
37
38
39
40
41
42
43
44
45
46
47
48
49
问题小结:optionsAPI的优缺点是什么? vue3 新增的 compositionAPI 有什么特征? 有什么优势?
optionsAPI:
- 优点:
易于学习和使用, 每个代码有着明确的位置 - 缺点: 相似的逻辑, 不容易复用
compositionAPI:
- 基于 逻辑功能 组织代码
- 可维护性好!
# setup 函数
composition api的使用, 需要配置一个setup 函数
- setup 函数是一个新的组件选项, 作为组件中 compositionAPI 的起点
- 从生命周期角度来看, setup 会在 beforeCreate 钩子函数之前执行
- setup 中不能使用 this, this 指向 undefined
- 在模版中需要使用的数据和函数,需要在
setup返回。
<template>
  <div class="container">
    <h1 @click="say()">{{ msg }}</h1>
  </div>
</template>

<script lang="ts">
import { defineComponent } from 'vue'

export default defineComponent({
  setup() {
    console.log('setup执行了')
    console.log(this)
    // 定义数据和函数
    const msg = 'hi vue3'
    const say = () => {
      console.log(msg)
    }

    return { msg, say }
  },
  beforeCreate() {
    console.log('beforeCreate执行了')
    console.log(this)
  },
})
</script>
2
3
4
5
6
7
8
9
10
11
12
13
14
15
16
17
18
19
20
21
22
23
24
25
26
27
28
# reactive 函数
前置说明:
- setup 需要有返回值, 只有返回的值才能在模板中使用
- 默认普通的数据, 不是响应式的
作用: 传入一个复杂数据类型,将复杂类型数据, 转换成响应式数据 (返回该对象的响应式代理Proxy)
<template>
  <div>{{ obj.name }}</div>
  <div>{{ obj.age }}</div>
  <button @click="obj.name = 'ls'">改值</button>
</template>

<script lang="ts">
import { defineComponent, reactive } from 'vue'

export default defineComponent({
  setup() {
    // 1. setup 需要返回值, 返回的值才能在模板中使用
    // 2. 默认的普通的值不是响应式的, 需要用 reactive 函数
    const obj = reactive({
      name: 'zs',
      age: 18,
    })

    return { obj }
  },
})
</script>
2
3
4
5
6
7
8
9
10
11
12
13
14
15
16
17
18
19
20
21
22
23
总结: 通常是用来定义响应式 对象数据
问题小结:
- 默认 setup 函数中返回的 普通对象 是响应式的么 ?
- reactive 函数的作用是什么 ?
# ref 函数
reactive 处理的数据, 必须是复杂类型, 如果是简单类型无法处理成响应式, 所以有 ref 函数!
作用: 对传入的数据(一般简单数据类型),包裹一层对象, 转换成响应式。
- ref 函数接收一个的值, 返回一个ref 响应式对象, 有唯一的属性 value
- 在 setup 函数中, 通过 ref 对象的 value 属性, 可以访问到值
- 在模板中, ref 属性会自动解套, 不需要额外的 .value
- ref函数也支持传入复杂类型,传入复杂类型,也会做响应式处理
<template>
  <div>{{ money }}</div>
  <button @click="money++">改值</button>
</template>

<script lang="ts">
import { defineComponent, reactive, ref } from 'vue'
export default defineComponent({
  setup() {
    let money = ref(100)
    money.value++
    return { money }
  },
})
</script>
2
3
4
5
6
7
8
9
10
11
12
13
14
15
16
ref 和 reactive 的最佳使用方式:
- 明确的对象,明确的属性,用 reactive,其他用 ref
- 从vue3.2之后,官方更推荐使用 ref
问题小结:
ref 函数的作用是什么 ?
- 定义响应式数据。
ref 函数包裹简单类型后, 会包裹成对象, 在模板中需要 .value 么? 在 setup 中需要 .value 么?
- 在模板中需要 .value 么? 不需要,模板中会自动解套
- 在 setup 中需要 .value 么? 需要,.value
# script setup 语法(★)
script setup是在单文件组件 (SFC) 中使用组合式 API 的编译时语法糖。相比于普通的 script 语法更加简洁
要使用这个语法,需要将 setup 添加到 <script> 代码块上:
<script setup lang="ts">
console.log('hello script setup')
console.log(this)    // undefined
</script>
2
3
4
顶层的绑定会自动暴露给模板,所以定义的变量,函数和import导入的内容都可以直接在模板中直接使用
<template>
  <div>
    <h3>根组件</h3>
    <div>点击次数:{{ count }}</div>
    <button @click="add">点击修改</button>
  </div>
</template>

<script setup lang="ts">
import { ref } from 'vue'

const count = ref(0)
const add = () => {
  count.value++
}
</script>
2
3
4
5
6
7
8
9
10
11
12
13
14
15
16
17
script setup 优势:
- 使用
ts项目不需要再defineComponent包裹了。 - 无需再
return了,template可直接使用,顶层的绑定会自动暴露给模板。
# 案例:显示鼠标案例
使用setup语法完成鼠标案例
<template>
  <div>当前鼠标位置</div>
  <div>x: {{ mouse.x }}</div>
  <div>y: {{ mouse.y }}</div>
  <div>当前点击次数:{{ count }}</div>
  <button @click="add">点击</button>
</template>

<script setup lang="ts">
import { onMounted, onUnmounted, reactive, ref } from 'vue'
const count = ref(0)
const add = () => {
  count.value++
}
const mouse = reactive({
  x: 0,
  y: 0,
})
const move = (e: MouseEvent) => {
  mouse.x = e.pageX
  mouse.y = e.pageY
}
onMounted(() => {
  document.addEventListener('mousemove', move)
})
onUnmounted(() => {
  document.removeEventListener('mousemove', move)
})
</script>
2
3
4
5
6
7
8
9
10
11
12
13
14
15
16
17
18
19
20
21
22
23
24
25
26
27
28
29
30
# 钩子函数的使用
生命周期函数 (opens new window) vue3 中的生命周期函数, 需要在 setup 中调用
<script setup lang="ts">
import { onMounted, onUpdated, onUnmounted } from 'vue'
onMounted(() => {
  console.log('mounted!')
})
onUpdated(() => {
  console.log('updated!')
})
onUnmounted(() => {
  console.log('unmounted!')
})
</script>
2
3
4
5
6
7
8
9
10
11
12
# 计算属性computed函数
computed函数调用时, 要接收一个处理函数, 处理函数中, 需要返回计算属性的值
<template>
  <div>我今年的年纪 <input type="text" v-model.number="age" /></div>
  <div>我明年的年龄 {{ nextAge }}</div>
  <div>我后年的年龄 <input type="text" v-model.numbe="nextAge2" /></div>
</template>

<script setup lang="ts">
import { computed, ref } from 'vue'
const age = ref(10)
// 不带set的计算属性
const nextAge = computed(() => {
  return age.value + 1
})

// 带set的计算属性
const nextAge2 = computed({
  get() {
    return age.value + 2
  },
  set(val: number) {
    age.value = val - 2
  },
})
</script>
2
3
4
5
6
7
8
9
10
11
12
13
14
15
16
17
18
19
20
21
22
23
24
25
问题小结: computed 函数提供计算属性, 有几种写法?
- 简单写法,不带set的计算
- 复杂写法,带 set 的计算,传入对象
# 侦听器watch函数
watch 侦听器, 接收三个参数
1. 参数1: 监视的数据源
2. 参数2: 回调函数
3. 参数3: 额外的配置
// 监听单个ref
const money = ref(100)
watch(money, (value, oldValue) => {
  console.log(value)
})

// 监听多个ref
const money = ref(100)
const count = ref(0)
watch([money, count], (value) => {
  console.log(value)
})

// 监听ref复杂数据
const user = ref({
  name: 'zs',
  age: 18,
})
watch(
  user,
  (value) => {
    console.log('user变化了', value)
  },
  {
    // 深度监听,当ref的值是一个复杂数据类型,需要深度监听
    deep: true,
    immediate: true
  }
)

// 监听对象的某个属性的变化
const user = ref({
  name: 'zs',
  age: 18,
})
watch(
  () => {
      return user.value.name
  },
  (value) => {
    console.log(value)
  }
)
2
3
4
5
6
7
8
9
10
11
12
13
14
15
16
17
18
19
20
21
22
23
24
25
26
27
28
29
30
31
32
33
34
35
36
37
38
39
40
41
42
43
# 组件通讯-父传子
目标:能够实现组件通讯中的父传子组件通讯
步骤:
- 父组件提供数据
- 父组件将数据传递给子组件
- 子组件通过
defineProps进行接收 - 子组件渲染父组件传递的数据
核心代码:
父组件 src/App.vue
<script setup lang="ts">
// 在setup语法中,只需要导入子组件,就可以渲染,不需要components注册
import { ref } from 'vue'
import Son from './components/Son.vue'

const money = ref(100)
const car = ref('五菱宏光MINI')
</script>

<template>
  <h1>根组件-{{ money }} --- {{ car }}</h1>
  <hr />
  <Son :money="money" :car="car"></Son>
</template>
2
3
4
5
6
7
8
9
10
11
12
13
14
15
子组件 src/components/Son.vue
<script setup lang="ts">
import { computed } from 'vue'

// defineProps: 接收父组件传递的数据
interface Props {
  money: number
  car: string
}
const props = defineProps<Props>()

const myMoney = computed(() => {
  return props.money + 100
})
</script>

<template>
  <h3>子组件---{{ money }} --- {{ car }} ---{{ myMoney }}</h3>
</template>
2
3
4
5
6
7
8
9
10
11
12
13
14
15
16
17
18
19
注意:
如果使用
defineProps接收数据,这个数据只能在模板中渲染如果想要在
<script>中也访问props属性,应该接收返回值。
# 组件通讯-子传父
目标:能够实现组件通讯中的子传父
步骤:
- 子组件通过
defineEmits获取emit对象(因为没有this) - 子组件通过emit触发事件,并且传递数据
- 父组件提供方法
- 父组件通过自定义事件的方式给子组件注册事件
核心代码
子组件
<script setup lang="ts">
// defineProps: 接收父组件传递的数据
interface Props {
  money: Number
  car: String
}
const props = defineProps<Props>()

const emit = defineEmits(['xiu'])

const xiu = () => {
  emit('xiu', 1000)
}
</script>

<template>
  <h3>子组件---{{ money }} --- {{ car }}</h3>
  <button @click="xiu">刷火箭</button>
</template>
2
3
4
5
6
7
8
9
10
11
12
13
14
15
16
17
18
19
20
父组件
<script setup lang="ts">
// 在setup语法中,只需要导入子组件,就可以渲染,不需要components注册
import { ref } from 'vue'
import Son from './components/Son.vue'

const money = ref(10000)
const car = ref('五菱宏光MINI')

const handlerXiu = (val: number) => {
  money.value += val
}
</script>

<template>
  <h1>根组件-{{ money }} --- {{ car }}</h1>
  <hr />
  <Son :money="money" :car="car" @xiu="handlerXiu"></Son>
</template>
2
3
4
5
6
7
8
9
10
11
12
13
14
15
16
17
18
19
# 组件通讯-依赖注入 - provide 和 inject
依赖注入, 可以非常方便的实现 跨层级的 组件通信
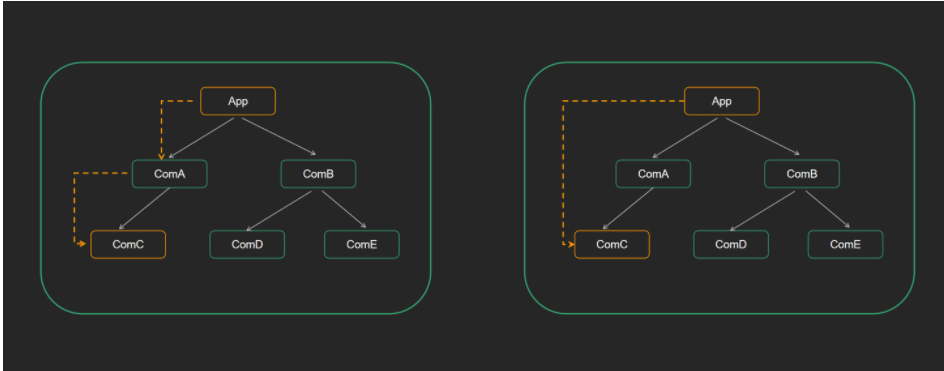
父组件利用 provide 提供数据
<script setup lang="ts">
import { provide, ref } from 'vue'
import Son from './components/Son.vue'
const money = ref(100)
const car = ref('小黄车')

provide('money', money)
provide('car', car)
</script>

<template>
  <h1>根组件-{{ money }} --- {{ car }}</h1>
  <hr />
  <Son></Son>
</template>
2
3
4
5
6
7
8
9
10
11
12
13
14
15
16
子组件 (子孙后代, 都可以拿到这个数据)
<script setup lang="ts">
import { inject, Ref } from 'vue'

const money = inject<Ref<number>>('money')
const car = inject<Ref<string>>('car')

const changeMoney = (m: number) => {
  if (money) {
    money.value = money.value - m
  }
}
</script>
<template>
  <h5>Sun组件--{{ money }} --- {{ car }}</h5>
  <button @click="changeMoney(10)">修改</button>
</template>
2
3
4
5
6
7
8
9
10
11
12
13
14
15
16
17
如果希望子传父, 可以 provide 传递一个方法
父组件
<script setup lang="ts">
import { provide, ref } from 'vue'
import Son from './components/Son.vue'
const money = ref(100)
const car = ref('小黄车')

provide('money', money)
provide('car', car)

const changeMoney = (m: number) => {
  if (money) {
    money.value = money.value - m
  }
}
provide('changeMoney', changeMoney)
</script>

<template>
  <h1>根组件-{{ money }} --- {{ car }}</h1>
  <hr />
  <Son></Son>
</template>
2
3
4
5
6
7
8
9
10
11
12
13
14
15
16
17
18
19
20
21
22
23
子组件
<script setup lang="ts">
import { inject, Ref } from 'vue'

const money = inject<Ref<number>>('money')
const car = inject<Ref<string>>('car')
const changeMoney = inject<(m: number) => void>('changeMoney')
</script>

<template>
  <h5>Sun组件--{{ money }} --- {{ car }}</h5>
  <button @click="changeMoney && changeMoney(10)">修改</button>
</template>
2
3
4
5
6
7
8
9
10
11
12
13
# 模板中 ref 的使用
联想之前的 ref 和 $refs, 获取模板的元素(dom元素,组件)
1 创建 ref => const hRef = ref(null)
2 模板中建立关联 => <h1 ref="hRef">钩子函数-----123</h1>
3 使用 => hRef.value
<script setup lang="ts">
import { ref } from 'vue'

const hRef = ref<HTMLHeadingElement | null>(null)
const clickFn = () => {
  if (hRef.value) {
    hRef.value.innerText = '我不是标题'
  }
}
</script>

<template>
  <div>
    <h1 ref="hRef">我是标题</h1>
    <button @click="clickFn">操作DOM</button>
  </div>
</template>
2
3
4
5
6
7
8
9
10
11
12
13
14
15
16
17
18
ref操作组件
<script setup lang="ts">
import { ref } from 'vue'
import Form from './components/Form.vue'

// 1. 提供一个ref
const h1Ref = ref<HTMLHeadElement | null>(null)
const formRef = ref<InstanceType<typeof Form> | null>(null)

const fn = () => {
  // 3. 通过ref访问DOM对象
  console.log(h1Ref.value?.innerHTML)

  console.log(formRef.value?.count)
  formRef.value?.validate()
}
</script>

<template>
  <!-- 2. 关联DOM -->
  <h1 ref="h1Ref">根组件</h1>
  <button @click="fn">修改</button>
  <hr />

  <Form ref="formRef"></Form>
</template>
2
3
4
5
6
7
8
9
10
11
12
13
14
15
16
17
18
19
20
21
22
23
24
25
26
需要配合 defineExpose
<script setup lang="ts">
import { ref } from 'vue'

const count = ref(0)
const validate = () => {
  console.log('表单组件内部的校验方法')
}
// 暴露属性给外部组件使用
defineExpose({
  count,
  validate,
})
</script>

<template>
  <h3>我是Form组件</h3>
</template>
2
3
4
5
6
7
8
9
10
11
12
13
14
15
16
17
18
# vue3 中废弃了过滤器
vue3 中不能使用过滤器,直接使用函数进行替代。
<script setup lang="ts">
import moment from 'moment'
const time = new Date()

const formatTime = (time: Date) => {
  return moment(time).format('YYYY-MM-DD')
}
</script>

<template>
  <div>当前时间:{{ formatTime(time) }}</div>
</template>
2
3
4
5
6
7
8
9
10
11
12
# 补充 - toRefs 函数
使用场景: 如果对一个响应数据, 进行解构 或者 展开, 会丢失他的响应式特性!
原因: vue3 底层是对 对象 进行监听劫持
作用: 对一个响应式对象的所有内部属性, 都做响应式处理
- reactive/ref的响应式功能是赋值给对象的, 如果给对象解构或者展开, 会让数据丢失响应式的能力
- 使用 toRefs 可以保证该对象展开的每个属性都是响应式的
<template>
  <div>{{ money }}</div>
  <div>{{ car }}</div>
  <div>{{ name }}</div>
  <button @click="money++">改值</button>
</template>

<script setup lang="ts">
import { reactive, ref, toRefs } from 'vue'
const user = ref({
  name: 'zs',
  age: 18,
})
const { name, age } = toRefs(user.value)
</script>
2
3
4
5
6
7
8
9
10
11
12
13
14
15
问题小结: toRefs 函数的作用是什么 ?
作用: 对一个 响应式对象 的所有内部属性, 都做响应式处理, 保证展开或者解构出的数据也是响应式的
# 案例 - todos
# 基本架子搭建
- 素材中已经提供好了
- 要求:通过 Vue3 + TypeScript + script setup 组合式API 实现
# 列表展示功能
(1)在App.vue中提供数据
<script setup>
import TodoHeader from './components/TodoHeader.vue'
import TodoMain from './components/TodoMain.vue'
import TodoFooter from './components/TodoFooter.vue'

// 提供数据
const list = ref([
  {
    id: 1,
    name: '吃饭',
    done: true,
  },
  {
    id: 2,
    name: '睡觉',
    done: false,
  },
  {
    id: 3,
    name: '打豆豆',
    done: false,
  },
])
</script>
2
3
4
5
6
7
8
9
10
11
12
13
14
15
16
17
18
19
20
21
22
23
24
(2)传递给Main组件
<TodoMain :list="list"></TodoMain>
(3)子组件接收
<script setup>
defineProps({
  list: {
    type: Array,
    default: () => [],
  },
})
</script>
2
3
4
5
6
7
8
(4)子组件渲染
<ul class="todo-list">
  <li :class="{ completed: item.done }" v-for="item in list" :key="item.id">
    <div class="view">
      <input class="toggle" type="checkbox" :checked="item.done" />
      <label>{{ item.name }}</label>
      <button class="destroy"></button>
    </div>
    <input class="edit" value="Create a TodoMVC template" />
  </li>
</ul>
2
3
4
5
6
7
8
9
10
# 修改任务状态功能
(1)子组件注册事件
<input
  class="toggle"
  type="checkbox"
  :checked="item.done"
  @change="changeFn(item.id)"
/>
2
3
4
5
6
(2)子传父
<script setup>

const emit = defineEmits(['changeDone'])
const changeFn = (id) => {
  emit('changeDone', id)
}
</script>
2
3
4
5
6
7
(3)父组件
const changeDone = (id) => {
  const todo = list.value.find((item) => item.id === id)
  todo.done = !todo.done
}

<TodoMain :list="list" @changeDone="changeDone"></TodoMain>
2
3
4
5
6
# 删除功能
(1)子组件
const emit = defineEmits(['changeDone', 'delTodo'])

<button class="destroy" @click="emit('delTodo', item.id)"></button>
2
3
(2)父组件
const delTodo = (id) => {
  list.value = list.value.filter((item) => item.id !== id)
}

<TodoMain
  :list="list"
  @changeDone="changeDone"
  @delTodo="delTodo"
></TodoMain>
2
3
4
5
6
7
8
9
# 添加功能
(1)子组件
<script setup>
import { ref } from 'vue'

const todoName = ref('')
const emit = defineEmits(['addTodo'])
const add = (e) => {
  if (todoName.value) {
    emit('addTodo', todoName.value)
    todoName.value = ''
  }
}
</script>

<template>
  <header class="header">
    <h1>todos</h1>
    <input
      class="new-todo"
      placeholder="What needs to be done?"
      autofocus
      v-model="todoName"
      @keydown.enter="add"
    />
  </header>
</template>

<style lang="less" scoped></style>
2
3
4
5
6
7
8
9
10
11
12
13
14
15
16
17
18
19
20
21
22
23
24
25
26
27
28
(2)父组件
const addTodo = (name) => {
  list.value.unshift({
    id: Date.now(),
    name,
    done: false,
  })
}


<TodoHeader @addTodo="addTodo"></TodoHeader>
2
3
4
5
6
7
8
9
10
# 底部功能 (计算属性)
(1)子组件
<script setup>
import { computed } from 'vue'

const props = defineProps({
  list: {
    type: Array,
    default: () => [],
  },
})

const leftCount = computed(() => {
  return props.list.filter((item) => !item.done).length
})
</script>

<template>
  <footer class="footer">
    <span class="todo-count">
      <strong>{{ leftCount }}</strong> item left
    </span>
    <ul class="filters">
      <li>
        <a class="selected" href="#/">All</a>
      </li>
      <li>
        <a href="#/active">Active</a>
      </li>
      <li>
        <a href="#/completed">Completed</a>
      </li>
    </ul>
    <button class="clear-completed">Clear completed</button>
  </footer>
</template>

<style lang="less" scoped></style>
2
3
4
5
6
7
8
9
10
11
12
13
14
15
16
17
18
19
20
21
22
23
24
25
26
27
28
29
30
31
32
33
34
35
36
37
# 全选反选功能
(1)提供计算属性
const isCheckAll = computed(() => {
  return props.list.every((item) => item.done)
})
2
3
(2)注册事件
<input
  id="toggle-all"
  class="toggle-all"
  type="checkbox"
  :checked="isCheckAll"
  @change="emit('checkAll', !isCheckAll)"
/>
2
3
4
5
6
7
(3)父组件全选或者反选
const checkAll = (value) => {
  list.value.forEach((item) => (item.done = value))
}

<TodoMain
  :list="list"
  @changeDone="changeDone"
  @delTodo="delTodo"
  @checkAll="checkAll"
></TodoMain>
2
3
4
5
6
7
8
9
10
# watch 监视存到本地
watch(
  list,
  (value) => {
    localStorage.setItem('todos', JSON.stringify(value))
  },
  {
    deep: true,
  }
)
2
3
4
5
6
7
8
9