 设计模式笔记
# 基础知识
# 面向对象的javascript_
# 多态
实际含义:统一操作作用于不同的对象上面,可以产生不同的解释和不同的执行结果。换句话说,给不同的对象发送同一消息的时候,这些对象会根据这个消息分别给出不同的反馈.
举个例子: 主人让鸡、鸭分别发出叫声,但是各自发出的声音不同
var makeSound = function( animal ){
if ( animal instanceof Duck ){
    console.log( '嘎嘎嘎' );
    }else if ( animal instanceof Chicken ){
    console.log( '咯咯咯' );
    }
};
var Duck = function(){};
var Chicken = function(){};
makeSound( new Duck() ); // 嘎嘎嘎
makeSound( new Chicken() ); // 咯咯咯
2
3
4
5
6
7
8
9
10
11
12
上面的代码体现了多态性当加入的动物越来越多,比如“狗” , 则makeSound就会变得越来越大,变成一个巨大的函数
多态的背后思想就是 : [ 做什么 ] - [ 谁去做 ] - [ 怎么做 ] 分离开来
换句话说:就是讲不变的事物【动物发出叫声】与可能改变的事物【具体声音】分离。
上述例子中:动物叫是不变的,但是不同类型的动物具体怎么叫是可变的,把不变的部分隔离出来,不可变的部分封装起来,具体操作如下:
//  把不变的部分隔离出来:所有动物都会发出叫声
var makeSound = function( animal ){
	animal.sound();
};

// 把可变的部分各自封装起来

var Duck = function(){}
Duck.prototype.sound = function(){
    console.log( '嘎嘎嘎' );
};

var Chicken = function(){}
Chicken.prototype.sound = function(){
    console.log( '咯咯咯' );
};

makeSound( new Duck() ); // 嘎嘎嘎
makeSound( new Chicken() ); // 咯咯咯
2
3
4
5
6
7
8
9
10
11
12
13
14
15
16
17
18
19
20
现在我们可以向,鸡鸭发出叫唤,他们接收到消息后分别做出了不同的反应。
如果有一天,动物世界又加了一条狗,只需要添加如下代码,而不需要懂修改以前的makeSound函数
var Dog = function(){}
Dog.prototype.sound = function(){
	console.log( '汪汪汪' );
};
makeSound( new Dog() ); // 汪汪汪
2
3
4
5
# 多态在面向对象程序设计中的作用
最根本的作用就是通过过程化的条件分支语句转换为对象的对泰兴,从而消除这些条件分支语句
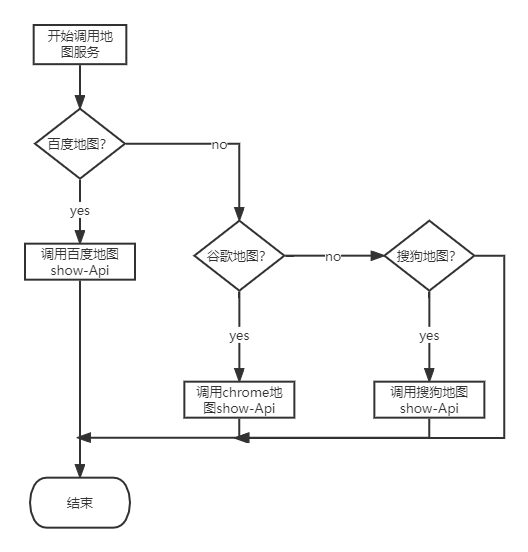
假设要编写一个地图应用,google、百度,目前选择的是谷歌地图,谷歌地图API中提供了show方法,负责在页面上展示一整个地图,示例代码如下:
var googleMap = {
    show: function(){
        console.log( '开始渲染谷歌地图' );
    }
};
var renderMap = function(){
    googleMap.show();
};
renderMap(); // 输出:开始渲染谷歌地图
2
3
4
5
6
7
8
9
后来因为某些原因,要把谷歌地图换成百度地图,为了让 renderMap 函数保持一定的弹性,
我们用一些条件分支来让 renderMap 函数同时支持谷歌地图和百度地图:
var googleMap = {
    show: function(){
    console.log( '开始渲染谷歌地图' );
    }
};
var baiduMap = {
    show: function(){
    console.log( '开始渲染百度地图' );
    }
};
var renderMap = function( type ){
    if ( type === 'google' ){
    	googleMap.show();
    }else if ( type === 'baidu' ){
        baiduMap.show();
    }
};
renderMap( 'google' ); // 输出:开始渲染谷歌地图
renderMap( 'baidu' ); // 输出:开始渲染百度地图
2
3
4
5
6
7
8
9
10
11
12
13
14
15
16
17
18
19
可以看到,虽然 renderMap 函数目前保持了一定的弹性,但这种弹性是很脆弱的,一旦需要替换成搜搜地图,那无疑必须得改动 renderMap 函数,继续往里面堆砌条件分支语句。
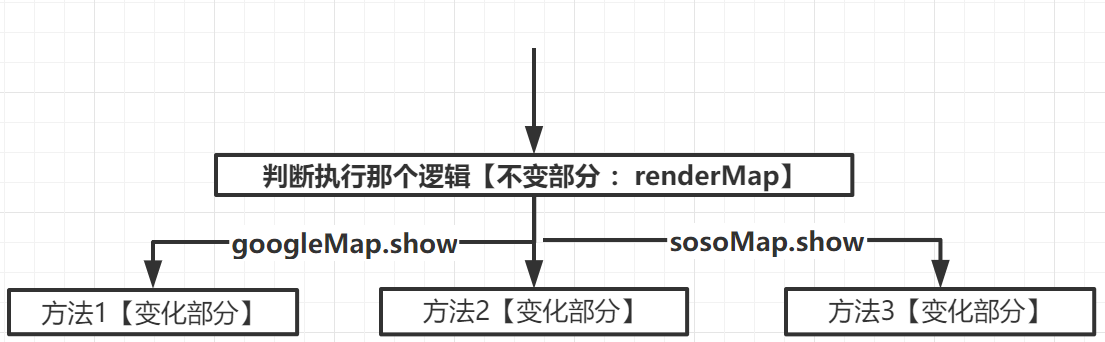
我们还是先把程序中相同的部分抽象出来,那就是显示某个地图
var renderMap = function( map ){
    if ( map.show instanceof Function ){
 	   map.show();
    }
};

renderMap( googleMap ); // 输出:开始渲染谷歌地图
renderMap( baiduMap ); // 输出:开始渲染百度地图
2
3
4
5
6
7
8
上述代码,当我们想谷歌地图对象和百度地图对象发出‘展示地图’的消息时,会分别调用他们的show方法,就会产生不同的执行结果。
对象的多态性提示我们,‘做什么’、‘怎么做’ ,是可以分开的,即使以后增加了搜搜地图, renderMap 函数仍然不需要做任何改变,如下所示:
var sosoMap = {
    show: function(){
  	  console.log( '开始渲染搜搜地图' );
    }
};
renderMap( sosoMap ); // 输出:开始渲染搜搜地图
2
3
4
5
6
流程图呈现前后比较:
前
后
# 封装
**封装:**指代 ‘ 任何形式的封装 ’,包括隐藏实现细节、设计细节、以及隐藏对象类型...
**封装细节:**封装使得内部变化对于外部来说,是不可见的,对象对自己的行为负责。其他对象不关心它的内部实现
# 封装数据
由于javascript没有private、public、protected等关键字来提供不同的访问权限,所以只能通过依赖变量的作用域来实现封装特性,模拟出相同的效果
除了es6提供的let外,一般可以通过函数来创建作用域:
var myObject = (function(){
    var __name = 'sven' //私有变量(private)
    return {
        getName:function(){
        		return __name
    	}
    }
})();

console.log(myObject.getName())  // sven
console.log(myObject.__name)  // undefined
2
3
4
5
6
7
8
9
10
11
另外值得一提的是:es6中可以通过Symbol创建私有属性
# 封装类型(暂不介绍)
# 封装变化(暂不介绍)
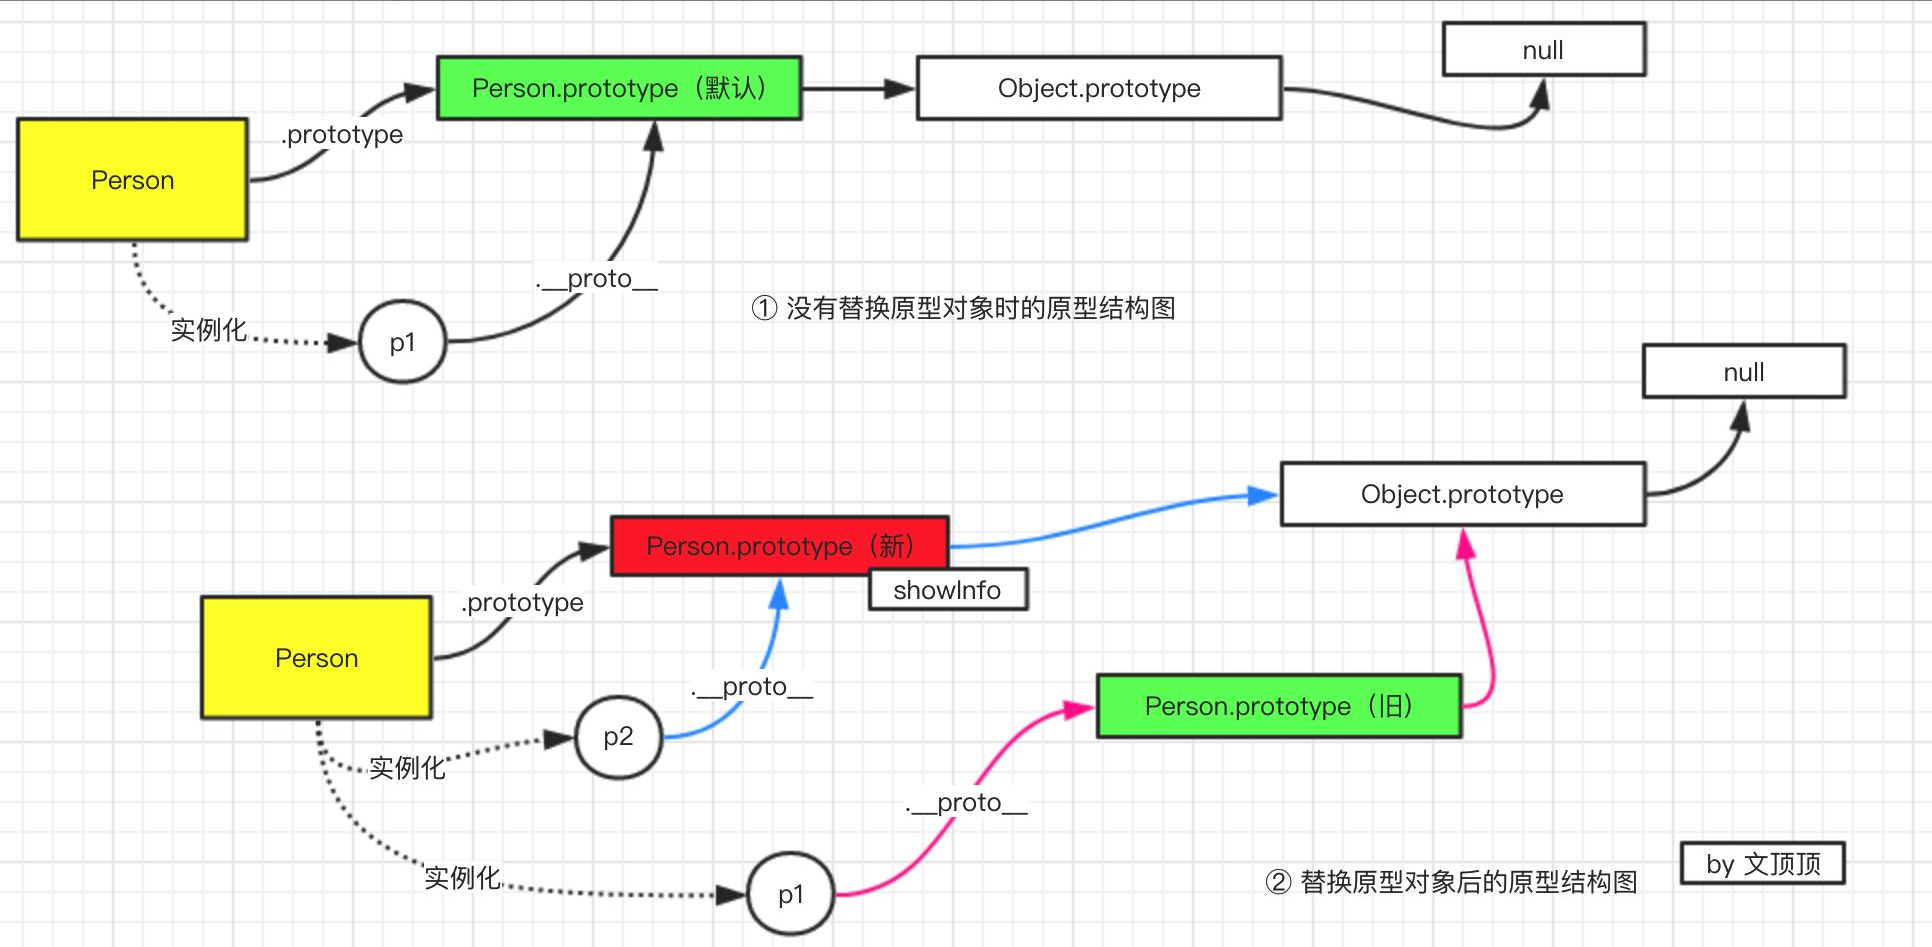
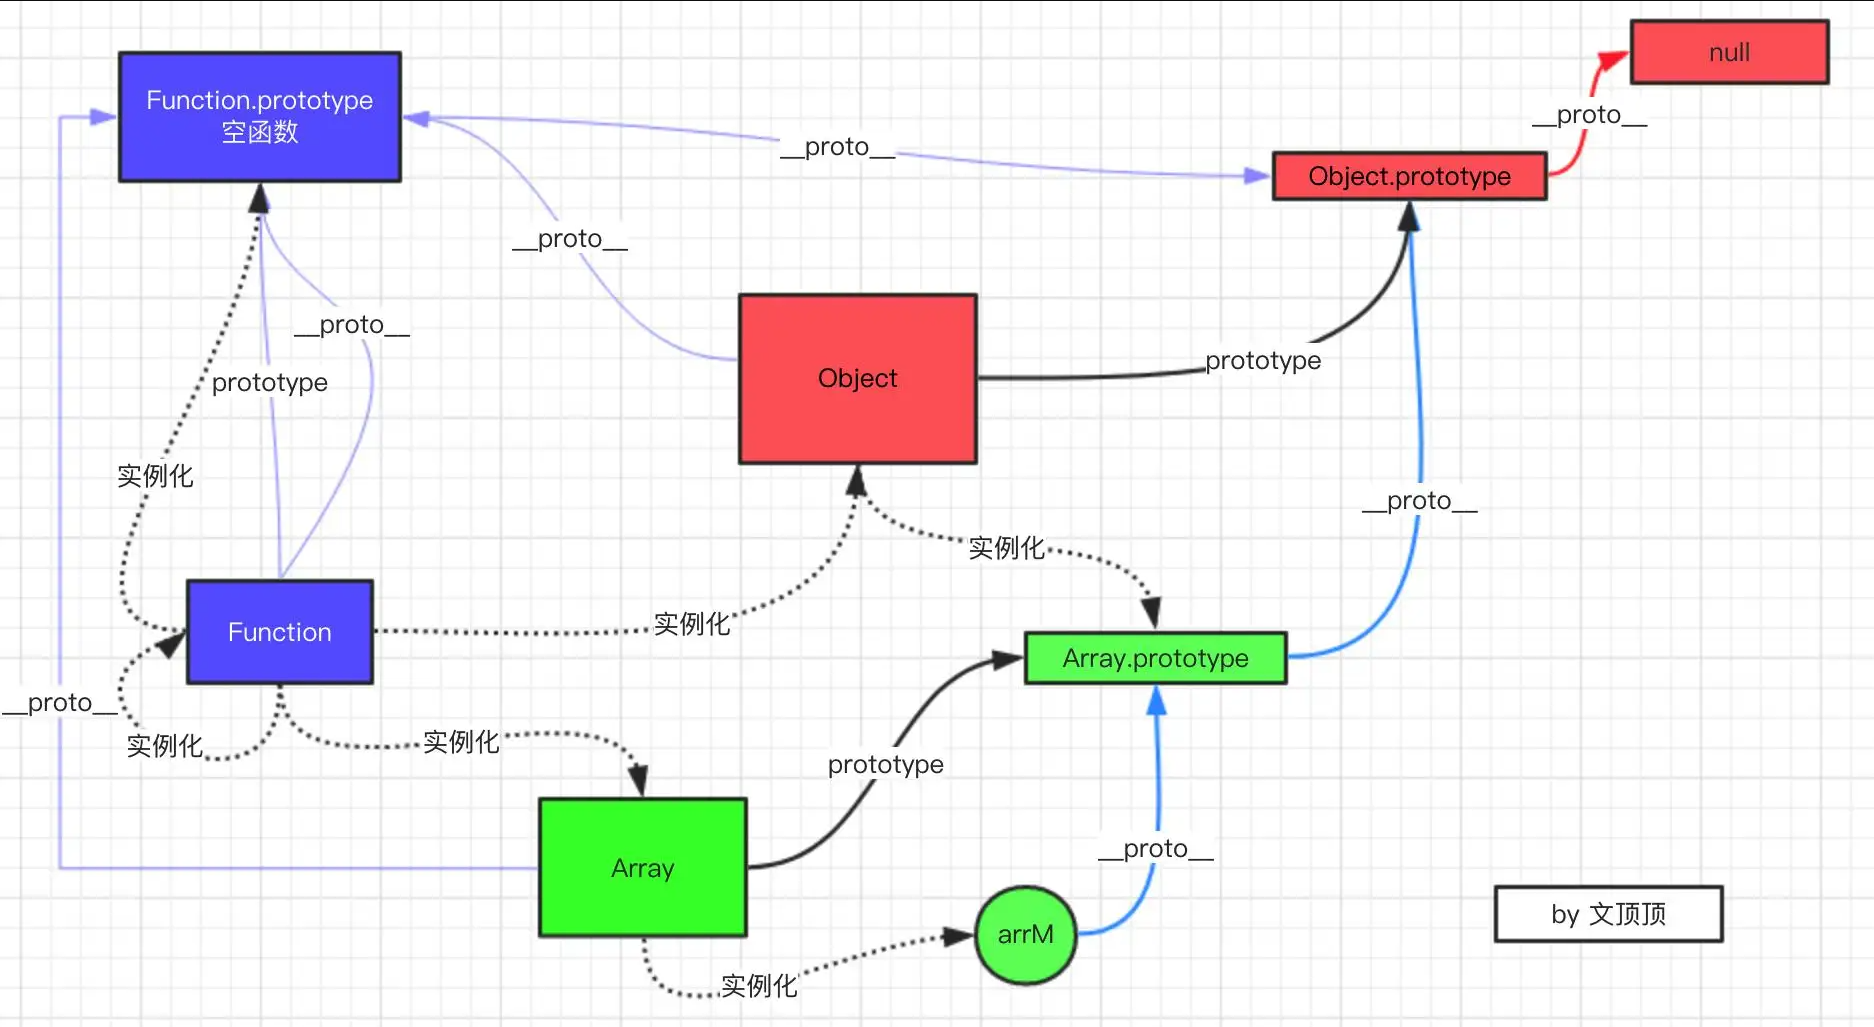
# 原型模式和基于原型继承的Javascript对象系统
在以类为中心的面向对象编程语言中,类和对象的关系可以想象成【铸模】 - 【铸件】的关系,对象总是从类中创建而来。
# this、call、apply
# this指向
具体到实际应用中,大致分为4种情况:
- 作为对象的方法调用
- 作为普通函数调用
- 构造器调用
Function.prototype.call或者Function.prototype.apply
1、作为对象的方法调用
当函数作为对象的方法被调用时,this指向该对象
// 声明
var obj = {
  a:1,
    getA:function(){
        alert(this === obj); // 输出true
        alert(this.a) // 输出1
    }
};

// 调用
obj.getA();
2
3
4
5
6
7
8
9
10
11
12
2、作为普通函数调用
当函数不作为对象的属性被调用时,也就是我们常说的普通函数方式,此时的 this 总是指 向全局对象。在浏览器的 JavaScript 里,这个全局对象是 window 对象。
 // 情况1
window.name = "globalName"

var getName = function(){
    return this.name;
}

console.log(getName())  // 输出:globaName
2
3
4
5
6
7
8
9
 // 情况2
window.name = 'globalName'
var myObject = {
    name:'sven',
    getName:function(){
        return this.name
    }
}

var getName = myObject.getName;
console.log(getName())  // 输出:globaName
2
3
4
5
6
7
8
9
10
11
有时候我们会有一些困扰,比如在div节点的事件函数内部,有一个局部的callback方法,callback方法被作为普通函数调用时,callback内部的this指向了window,但我们往往是想让它指向该div节点,见如下代码:
<html>
  <body>
    <div id="div1">我是一个 div</div>
  </body>
  <script>
    window.id = "window";
    document.getElementById("div1").onclick = function () {
      alert(this.id); // 输出: 'div1'
      var callback = function () {
        // 这里的this指向windows , 因为是在function中,且赋值给了另一个变量callback
        // 因为并非作为一个对象的函数被调用、而是生命在全局下的fucntioin
        console.log(this); // 输出: 'window'
      };
      callback();
    };
  </script>
</html>

//
2
3
4
5
6
7
8
9
10
11
12
13
14
15
16
17
18
19
20
如果想要callback中的this指向dom元素,可以用that = this,然后在其内部使用that.id代码如下
document.getElementById( 'div1' ).onclick = function(){
    var that = this; // 保存 div 的引用
    var callback = function(){
        alert ( that.id ); // 输出: 'div1'
    }
    callback();
}
2
3
4
5
6
7
3、构造器调用
大部分javascript函数都可以当做构造器使用。构造器的外表跟普通函数一模一样,他们的区别在于被调用的方式。
当用new运算符调用函数是,该函数总会返回一个对象,而构造器中的this就只想返回的这个对象,代码如下:
var MyClass = function(){
    this.name = 'sven';
};
var obj = new MyClass();
alert ( obj.name ); // 输出: sven
1
2
3
4
5但用 new 调用构造器时,还要注意一个问题,如果构造器显式地返回了一个 object 类型的对 象,那么此次运算结果最终会返回这个对象,而不是我们之前期待的 this:
var MyClass = function(){
    this.name = 'sven';
    return { // 显式地返回一个对象
   	  name: 'anne'
    }
};
var obj = new MyClass();
alert ( obj.name ); // 输出: anne
1
2
3
4
5
6
7
8如果构造器不显式地返回任何数据,或者是返回一个非对象类型的数据,就不会造成上述问题:
var MyClass = function(){
    this.name = 'sven'
    return 'anne'; // 返回 string 类型
};
var obj = new MyClass();
alert ( obj.name ); // 输出: sven
1
2
3
4
5
6
4、Function.prototyp.call 或者Function.prototype.apply调用
跟普通的函数调用相比,用 Function.prototype.call 或 Function.prototype.apply 可以动态地改变传入函数的 this:
var obj1 = {
    name: 'sven',
    getName: function(){
  	  return this.name;
    }
};
var obj2 = {
    name: 'anne'
};
console.log( obj1.getName() ); // 输出: sven
console.log( obj1.getName.call( obj2 ) ); // 输出: anne
2
3
4
5
6
7
8
9
10
11
原型链图:
# 丢失的this
var obj = {
    myName: 'sven',
    getName: function(){
  	  return this.myName;
    }
};
console.log( obj.getName() ); // 输出: 'sven'
var getName2 = obj.getName;
console.log( getName2() ); // 输出: undefined
2
3
4
5
6
7
8
9
当调用 obj.getName 时, getName 方法是作为 obj 对象的属性被调用的,根据 2.1.1 节提到的规律,此时的 this 指向 obj 对象,所以 obj.getName()输出'sven'。
当用另外一个变量 getName2 来引用 obj.getName,并且调用 getName2 时,根据 2.1.2 节提到的规律,此时是普通函数调用方式, this 是指向全局 window 的,所以程序的执行结果是 undefined
其实函数就是一段同步代码的语句集合,当将对象内部的函数赋值给全局变量
getName2的时候,其实是将其内部打语句拷贝,然后进行赋值,如下所示
var getName2 = function(){
    return this.myName
    // 因为全局作用域windows下并没有myName这个变量,所以this.myName = undefined【 注意这里的this指向window 】
}
2
3
4
例子2:
document.getElementById这个方法名实在有点过长,我们大概尝试过用一个短的函数来代替它,如同 prototype.js 等一些框架所做过的事情:
var getId = function( id ){
	return document.getElementById( id );
};
getId( 'div1' );
2
3
4
我们也许思考过为什么不能用下面这种更简单的方式:
var getId = document.getElementById;
getId( 'div1' );
2
<html>
    <body>
  	  <div id="div1">我是一个 div</div>
    </body>
<script>
    var getId = document.getElementById;
    getId( 'div1' );
</script>
</html>
2
3
4
5
6
7
8
9
在 Chrome、 Firefox、 IE10 中执行过后就会发现,这段代码抛出了一个异常。这是因为许多引擎的 document.getElementById方法的内部实现中需要用到 this。这个 this 本来被期望指向document,当 getElementById方法作为 document 对象的属性被调用时,方法内部的 this 确实是指向 document 的。
但当用 getId来引用document.getElementById之后, 再调用 getId,此时就成了普通函数调用,函数内部的 this 指向了 window,而不是原来的 document。我们可以尝试利用 apply 把 document 当作 this 传入 getId函数,帮助“修正” this:
document.getElementById = (function( func ){
    console.log(arguments,'arguments')  // 在js的function中,默认会有一个arguments参数,可接收函数传入的参数
    console.log(this,'this')  // 这里的this指向windows
    return function(){
   		 return func.apply( document, arguments );
    }
})( document.getElementById );
var getId = document.getElementById;
var div = getId( 'div1' );
alert (div.id); // 输出: div1
2
3
4
5
6
7
8
9
10
<html>
  <body>
    <div id="div1">我是一个 div</div>
  </body>
  <script>
    document.getElementById = (function( func ){
        // 这里如果获取arguments,则表示func这个形参对应的实际参数
        return function(){
            console.log(this,'this')  // 这里的this指向windows
            return func.apply( document, arguments ); // 这里的arguments是指代getId传入的参数:比如div1
        }
    })( document.getElementById );
    var getId = document.getElementById;  // 其内部的this原本是指向windows
    var div = getId( 'div1' );
    console.dir(div)
    alert (div.id); // 输出: div1
  </script>
</html>
2
3
4
5
6
7
8
9
10
11
12
13
14
15
16
17
18
19
# 拓展
//函数声明:使用function声明函数,并指定函数名。

function setFn() {    // coding   }

//函数表达式:使用function声明函数,但未指定函数名,将匿名函数赋予一个变量。

var setFn = function() {    // coding}

//匿名函数:使用function关键字声明函数,但未指定函数名。匿名函数属于函数表达式,匿名函数有很多作用,赋予一个变量则创建函数,赋予一个事件则成为事件处理程序或创建闭包等等。

function() {   } // coding
2
3
4
5
6
7
8
9
10
11
12
13
(function(){})是一个标准的函数定义、但是没有赋值给任何变量,所以是没有名字的函数,叫匿名函数,相当于一个匿名的function
function foo() {...}     // 这是定义,Declaration;定义只是让解释器知道其存在,但是不会运行。
foo();                   // 这是语句,Statement;解释器遇到语句是会运行它的。
2
# call 和apply
# 区别
call 和 apply 用法一模一样,区别在于传入参数形式不同
apply接收2个参数,第一个参数指定了函数体内this对象的指向;第二个参数为一个带下标的集合,可以为类数组var func = function( a, b, c ){ alert ( [ a, b, c ] ); // 输出 [ 1, 2, 3 ] }; func.apply( null, [ 1, 2, 3 ] ); //参数 1、 2、 3 被放在数组中一起传入 func 函数,它们分别对应 func 参数列表中的 a、 b、 c。1
2
3
4
5call传入的参数数量不固定,跟apply不同的是,第一个参数也是代表函数体内的this指向,第二个参数开始往后,每个参数被一次传入函数;var func = function( a, b, c ){ alert ( [ a, b, c ] ); // 输出 [ 1, 2, 3 ] }; func.call( null, 1, 2, 3 );1
2
3
4
call 是包装在 apply 上面的一颗语法糖,如果我们明确地知道函数接受多少个参数,而且想一目了然地表达形参和实参的对应关系,那么也可以用 call 来传送参数。 当使用 call 或者 apply 的时候,如果我们传入的第一个参数为 null,函数体内的 this 会指 向默认的宿主对象,在浏览器中则是 window:
var func = function( a, b, c ){
	alert ( this === window ); // 输出 true
};
func.apply( null, [ 1, 2, 3 ] )
2
3
4
5
如果再严格模式下,函数体内的this还是null
var func = function( a, b, c ){
"use strict";
	alert ( this === null ); // 输出 true
}
func.apply( null, [ 1, 2, 3 ] );
2
3
4
5
6
- 手写call函数
    function show(...args){
        console.log(args)
        console.log(this.name);
    }
2
3
4
由于show是一个函数,在javascript中,所有的函数都是有Funcition这个构造函数进行是实例化的对象
接下来我们要调用一下show这个方法,但是由于内部内有定义name这个属性,故会报错
怎么办 ? - 【 自己手写一个apply 修改show函数内部this 的指向 】
    Function.prototype.myCall = function(ctx,...args){
        // this 是Function生成的构造函数
         //   Function中的this ƒ show(...args){
         //   console.log(args)
        //    console.log(this.name);
       //       }
         // 步骤
        // 1  - 将方法挂载到我们传入的ctx
        // 2 -  将挂载以后的方法调用
        // 3 - 将我们添加的这个属性删除

        console.log('Function中的this',this);
        ctx.fn = this
        ctx.fn(...args)
    }
	//  一般call函数需要接收2个参数,第一个参数是,所调用函数this的上下文,第2个参数就是所调用函数的形参
1
2
3
4
5
6
7
8
9
10
11
12
13
14
15
16
17
调用一下show函数
show.myCall({name:'chamberlain'},'call1','call2','call3')
2
- 手写apply
function show(...args){
    console.log(args)
    console.log(this.name);
}

Function.prototype.myApply = function(ctx,args = []){
    ctx.fn = this
    ctx.fn(...args)
    delete ctx.fn
}

show.myApply({name:'chucheng'},['jack','allen','martain'])
2
3
4
5
6
7
8
9
10
11
12
- 手写bind
Function.prototype.myBind = function(ctx,...args1){
    console.log(...args1,'args1')

    return (args2)=>{
        ctx.fn = this
        ctx.fn(...args1.concat(args2))
        delete ctx.fn
    }
}

let bind =  show.myBind({name:'danina'},'jack','allen','martain')
console.log(bind,'bind')
2
3
4
5
6
7
8
9
10
11
12
# call 和 apply 用途
【1】改变this指向
call 和 apply 最常见的用途是改变函数内部的 this 指向,我们来看个例子:
var obj1 = {
	name: 'sven'
};
var obj2 = {
	name: 'anne'
};

window.name = 'window';
var getName = function(){
	alert ( this.name );
};

getName(); // 输出: window
getName.call( obj1 ); // 输出: sven
getName.call( obj2 ); // 输出: anne
2
3
4
5
6
7
8
9
10
11
12
13
14
15
【2】Function.prototype.bind
大部分高级浏览器都实现了内置的Function.prototype.bind 用来指定函数内部的this指向,即使没有,我们来模拟一个。
- 简单版本:
  Function.prototype.bind = function (context) {
    var self = this;
    console.log(this,'this2');            // ƒ (input) {console.log(this.name,input);}
    console.log(context,'context');       // context
    console.log(arguments,'arguments1');  // 0: {name: 'sven'}
    return function () {
      console.log(arguments,'arguments2'); //0: "chucheng"
      return self.apply(context,arguments)  // 这里才是执行console.log(this.name)的地方
    }
  }
  var obj = {
    name:'sven'
  }

  var func = function () {
    console.log(this.name); //sven
  }.bind(obj)

  func('chucheng')

  // 解析:
  /*
    1 - 由于func是对f().bind(obj)的引用,所以func是一个匿名函数
    2 - 当执行func时,实际上执行的是 self.apply(context,arguments)
    3 - obj 传入形参context,其指定了context为func函数体内的this
    4 - 把func看成一个有名函数,最后执行的是bind内部返回的函数
    5 - func传入的函数,实际上是传递给return function(){} 的形参,也就是内部的arguments这个类数组元素
  */
2
3
4
5
6
7
8
9
10
11
12
13
14
15
16
17
18
19
20
21
22
23
24
25
26
27
28
29
30
复杂版本:
<script>
  Function.prototype.bind = function () {
    var self = this,
    context = [].shift.call(arguments) //需要绑定的this上下文
    args = [].slice.call(arguments) // 剩余参数转化成数组
    return function () {
      // 这里是最后真正执行的函数
      return self.apply(context,[].concat.call(args,[].slice.call(arguments)))
      // 执行新函数的时候,会把之前传入的context当做新函数体内的this
      // 并且组合两次分别传入的参数,作为新函数的参数
      // args 表示bind除了obj之外的参数 | arguments表示func中传入的实参
    }
  }
  var obj = {
    name:'sven'
  }

  var func = function (a,b,c,d) {
    console.log(this.name); //sven
    console.log([a,b,c,d]); //[1,2,3,4]
  }.bind(obj,1,2)

  func(3,4)

</script>
2
3
4
5
6
7
8
9
10
11
12
13
14
15
16
17
18
19
20
21
22
23
24
25
26
【3】借用其他对象的方法
函数的参数列表arguments是一个类数组对象,虽然它有“ 下标 ”,但它并非真正的数组,所以也不能像数组一样,进行排序操作或者往集合里添加一个新的元素. 在这种情况下,我们常常会使用Array.proptype对象上的方法。
比如我们想往argument中添加一个新的元素,通常会借用Array.proptype.push:
(function(){
    	Array.proptype.push.call(argument,3);
    	console.log(arguments)   //输出[1,2,3]
})(1,2)
2
3
4
5
6
想操作argument转城真正的数组的时候,我们经常非常频繁地找Array.proptype对象借用方法
想把arguments转成真正的数组的时候,可以借用Array.prototype.slice方法。
想截取arguments列表中的头一个元素时,可以借用Array.prototype.shift方法
# 闭包 、高阶函数
# 闭包
闭包的形成与
变量的作用域以及变量的生存周期密切相关
# 变量的作用域
概念:变量的有效范围
**情况1:**在函数中声明一个var变量,这时候的变量就是局部变量,只有在该函数内部才能访问到这个变量,在函数外部无法访问
在javascript中,函数可以用来创造作用域,函数内部的变量对内可见、对外不可见
搜索变量的路径:从内部往外找,直到搜索到全局对象为止,案例如下:
var a = 1

var func = function (){
  var b = 2;
  var func2 = function(){
      var c = 3;
      alert(b);  //2
      alert(a);  //1
  }
  func2();
  alert(c);    //  Uncaught ReferenceError :c is not defined
};
2
3
4
5
6
7
8
9
10
11
12
13
14
15
# 变量生存周期
| 生存周期 | 备注 | |
|---|---|---|
| 全局变量 | 永久性 | 生命周期一直存在,除非销毁 |
| 局部变量 | 函数调用结束 - 销毁 |
var fun = function () {
    var a = 1;  // 退出函数后局部变量a 将被销毁
    alert(a)
}
2
3
4
var fun = function(){
    var a = 1;
    return function(){
        a++;
        alert( a )
    }
}

var f = func();
2
3
4
5
6
7
8
9
# 闭包的更多作用
- 封装变量
闭包可以帮助把一些不需要暴露在全局的变量封装城 “ 私有变量 ”
 var mult = function(){
     var a = 1;
     for ( var i = 0 ;l = arguments.length;i<l; i++ ){
         a = a* arguments[i]
     }
     return a
 }
2
3
4
5
6
7
8
9
mult函数接受一些number类型的参数,并返回这些参数的乘积
现在我们觉得对于那些相同参数来说,每次都进行计算是一种浪费,我们可以加入缓存机制来提高这个函数的性能;
var cache = {};
var mult = function(){
    var args = Array.prototype.join.call(argument,',')
    if(cache[ args ]){
        return cache[ args ]
    }

    var a = 1;
    for ( var i = 0; l = arguments.length;i<l;i++ ){
        a = a * arguments[i]
    }
    return cache[ args ] = a;
}

alert( mult(1,2,3) )   //6
alert( mult(1,2,3) )   //6
2
3
4
5
6
7
8
9
10
11
12
13
14
15
16
17
18
问题:由于cache这个变量仅仅在mult函数中被使用,与其让cache变量跟mult函数一起平行得暴露在全局作用域下,不如把它封闭在mult函数内部,这样可以减少页面中的全局变量,以避免这个变量被其他地方误操作而影响
var mult = (function(){
    var cache = {};
 	return function(){
        var args = Array.prototype.join.call(argument,',')
        if(cache[ args ]){
            return cache[ args ]
        }

        var a = 1;
        for ( var i = 0; l = arguments.length;i<l;i++ ){
            a = a * arguments[i]
        }
        return cache[ args ] = a;
    }
})();
2
3
4
5
6
7
8
9
10
11
12
13
14
15
16
17
18
再优化
var mult = (function(){
    var cache = {};
    var calculate = function(){
        var a = 1;
        for ( var i = 0; l = arguments.length;i<l;i++ ){
            a = a * arguments[i]
        }
        return a;
    },

 	return function(){
        var args = Array.prototype.join.call(argument,',')
        if(cache[ args ]){
            return cache[ args ]
        }
        return cache[ args ] = calculate.apply(null,arguments);
        // 也可以这么写: return cache[ args ] = calculate.call(null,...arguments);
         // 注意,这里的的第一个参数如果是null,既指向全局对象
    }
})();
2
3
4
5
6
7
8
9
10
11
12
13
14
15
16
17
18
19
20
21
22
23
24
25
- 闭包的另外一个用途:延续局部变量的寿命
# 高阶函数实现AOP
- b站的相关视频链接 (opens new window) (高阶函数之AOP切片编程)
所谓的AOP就是在执行原业务逻辑的前后插入,2段代码逻辑,从而实现函数的动态植入
// 原来
fn()

// 植入后
fn_before()
fn()
fn_after()
1
2
3
4
5
6
7
8
代码讲解过程:
        Function.prototype.before = function (callback){
            var _that = this
            // 这里的this是谁,要看,是谁调用了before,由下面代码知道是fn调用了before,所以this = fn
            return function(){
                callback()
                _that()
            }
        }
		// fn 是有Function实例化之后的一个对象
        var fn = function () {
            console.log('最原始函数')
        }
        var newFn =  fn.before(()=>{
            console.log('fn-之前执行')
        })

        newFn()
        // fn-之前执行
        // 最原始函数
2
3
4
5
6
7
8
9
10
11
12
13
14
15
16
17
18
19
优化:
        Function.prototype.before = function (beforeFn){
            var _self = this
            return function(){
                beforeFn.apply(this,arguments)
                return _self.apply(this,arguments)
            }
        }
        var fn = function () {
            console.log('最原始函数')
        }
        var newFn =  fn.before(()=>{
            console.log('fn-之前执行')
        })
        newFn()
        // fn-之前执行
        // 最原始函数
2
3
4
5
6
7
8
9
10
11
12
13
14
15
16
在优化( 加入后置函数 )
        Function.prototype.before = function (beforeFn){
            var _self = this
            return function(){
                beforeFn.apply(this,arguments)
                return _self.apply(this,arguments)
            }
        }
        Function.prototype.after = function (afterFn){
            var _self = this
            // 注意:这里的this只带的是最后调用after
            // 也就是执行完fn.before(()=>{})之后,调用的
            // 而执行fn.before(()=>{})返回了一个function(){}
            // 也就是最后返回的 function 调用了after,既this 就是 这个function
            /*  function(){
                    beforeFn.apply(this,arguments)
                    return _self.apply(this,arguments)
            } */
            return function(){
                var ret = _self.apply(this,arguments)
                afterFn.apply(this.arguments)
                return ret
            }
        }
        var fn = function () {
            console.log('最原始函数')
        }
        var newFn =  fn.before(()=>{
            console.log('fn-之前执行')
        }).after(function(){
            console.log('fn-之后执行')
        })
        newFn()
        // fn-之前执行
        // 最原始函数
        // fn-之后执行
2
3
4
5
6
7
8
9
10
11
12
13
14
15
16
17
18
19
20
21
22
23
24
25
26
27
28
29
30
31
32
33
34
35
# 高阶函数的其他应用
函数柯里化currying
一个函数首先会接收一些参数,接收这些参数之后,该函数并不会立即求值,而是立即返回另外一个函数,刚才传入的参数在函数形成的闭包中被保存起来。待到函数真正需要求值的时候,之前传入的所有参数都会被一次性用于求值。
	var currying = function (fn) {
        var args = []
        return function (){
            if(arguments.length === 0 ){
                return fn.apply(this,args)
            }else {
                [].push.apply(args,arguments)
                return argumtns.callee;
            }
        }
    }

    var cost = (function (){
        var money = 0 ;

        returen function (){
            for (var i = 0; l<arguments.length; i<l;i++) {
                money += arguments[i]
            }
            return money
        }
    })();

	var cost = currying(cost)
	cost(100)	// 未真正求值
	cost(200)   // 未真正求值
	cost(300)   // 未真正求值

	cost()  // 求值并输出 :600
2
3
4
5
6
7
8
9
10
11
12
13
14
15
16
17
18
19
20
21
22
23
24
25
26
27
28
29
30
31
# 工厂模式
在前端中,但项目需要大量创建对象的时候,我们可以借助工厂模式,将对象进行批量生产
<!DOCTYPE html>
<html lang="en">
  <head>
    <meta charset="UTF-8" />
    <meta http-equiv="X-UA-Compatible" content="IE=edge" />
    <meta name="viewport" content="width=device-width, initial-scale=1.0" />
    <title>Document</title>
    <script>
      function Person(name) {
        this.name = name;
      }
      Person.prototype.getName = function () {
        console.log(this.name);
      };

      function Car(model) {
        this.model = model;
      }
      Car.prototype.getModel = function () {
        console.log(this.model);
      };

      function create(type, param) {
         // 这里的this,如果是通过new进入的话,就指向new出来的对象
         //            如果是通过普通函数调用,则this有可能指向window或者其他顶级对象


        // return new this[type](param);
        if (this instanceof create) {
          //instanceof会判断后面的构造函数的原型,是不是存在在前面这个对象的原型链里
          return new this[type](param);
        } else {
          return new create(type, param);
        }
      }
      create.prototype = {
        person: Person,
        car: Car,
      };

      var person1 = new create("person", "zhang san");
      var car1 = create("car", "Benz");

      person1.getName(); //zhang san
      car1.getModel(); //Benz

      /*
        new create('person','zhang san') ==> {
          __proto__:create.prototype
        }

        person1 = new this[type](param) = new Person('zhang san') ==> {
          __proto__:Person.prototype
          name:'zhang san'
        }
      */
    </script>
  </head>
  <body></body>
</html>
2
3
4
5
6
7
8
9
10
11
12
13
14
15
16
17
18
19
20
21
22
23
24
25
26
27
28
29
30
31
32
33
34
35
36
37
38
39
40
41
42
43
44
45
46
47
48
49
50
51
52
53
54
55
56
57
58
59
60
61
# 观察者模式
观察者模式又叫做发布订阅模式或者消息模式,是设计模式中非常注明也是非常重要的一种模式。
这种模式一般会定义一个主题和众多个体,这里可以想想城一个消息中心,里面有各种各样的消息,众多的个体可以订阅不同的消息,当未来消息中心发布某条消息的时候,订阅过他的个体就会得到通知。
那什么是观察者模式那? 当对象之间存在一对多的依赖关系时,其中一个对象的状态发生改变,所有依赖它的对象都会收到通知,这就是观察者模式。
# 故事背景
前端宗门自从发布了传承方案后,宗门日渐繁荣,弟子们的水平不断提高,但新的问题出现了——高质量任务严重不足。宗门任务大殿每个月发布的五星任务是有限的,想要接取五星任务的弟子却如过江之鲫,于是滋生了武侠黄牛,恶意抢任务,坐地起价。
宗门不愿任务被恶意哄抢,决定调整任务市场秩序,因此推出任务订阅功能——观察者模式。
# 观察者模式
任务订阅的大致功能是这样的: 宗门推出五星任务订阅功能,弟子通过购买获得订阅权限,当宗门发布五星任务后,会通知拥有订阅权限的弟子。
那么任务订阅功能中有两类主体:
- 宗门任务大殿
- 维护拥有订阅权限的弟子列表
- 提供弟子购买订阅权限的功能
- 发布对应任务后通知有订阅权限的弟子
- 接受任务通知的弟子们
上面宗门任务大殿与弟子间的关系其实就构成了一个观察者模式。
那什么是观察者模式那? 当对象之间存在一对多的依赖关系时,其中一个对象的状态发生改变,所有依赖它的对象都会收到通知,这就是观察者模式。
在观察者模式中,只有两种主体:目标对象 (Object) 和 观察者 (Observer)。宗门任务大殿就是目标对象,弟子们就是观察者。
目标对象
Subject1:
- 维护观察者列表
observerList———— 维护拥有订阅权限的弟子列表 - 定义添加观察者的方法 ———— 提供弟子购买订阅权限的功能
- 当自身发生变化后,通过调用自己的
notify方法依次通知每个观察者执行update方法 ———— 发布对应任务后通知有订阅权限的弟子
- 维护观察者列表
观察者
Observer需要实现update方法,供目标对象调用。update方法中可以执行自定义的业务逻辑 ———— 弟子们需要定义接收任务通知后的方法,例如去抢任务或任务不适合,继续等待下一个任务
我们把上面的文字形象化一下:
class Observer {
    constructor(name) {
        this.name = name;
    }
    update({taskType, taskInfo}) {
        // 假设任务分为日常route和战斗war
        if (taskType === "route") {
            console.log(`${this.name}不需要日常任务`);
            return;
        }
        this.goToTaskHome(taskInfo);

    }
    goToTaskHome(info) {
        console.log(`${this.name}去任务大殿抢${info}任务`);
    }
}

class Subject {
    constructor() {
        this.observerList = []
    }
    addObserver(observer) {
        this.observerList.push(observer);
    }
    notify(task) {
        console.log("发布五星任务");
        this.observerList.forEach(observer => observer.update(task))
    }
}

const subject = new Subject();
const stu1 = new Observer("弟子1");
const stu2 = new Observer("弟子2");

// stu1 stu2 购买五星任务通知权限
subject.addObserver(stu1);
subject.addObserver(stu2);

// 任务殿发布五星战斗任务
const warTask = {
    taskType: 'war',
    taskInfo: "猎杀时刻"
}

// 任务大殿通知购买权限弟子
subject.notify(warTask);

// 任务殿发布五星日常任务
const routeTask = {
    taskType: 'route',
    taskInfo: "种树浇水"
}

subject.notify(routeTask);
2
3
4
5
6
7
8
9
10
11
12
13
14
15
16
17
18
19
20
21
22
23
24
25
26
27
28
29
30
31
32
33
34
35
36
37
38
39
40
41
42
43
44
45
46
47
48
49
50
51
52
53
54
55
56
输出结果:
// 战斗任务
发布五星任务
弟子1去任务大殿抢猎杀时刻任务
弟子2去任务大殿抢猎杀时刻任务

// 日常任务
发布五星任务
弟子1不需要日常任务
弟子2不需要日常任务
复制代码
2
3
4
5
6
7
8
9
10
通过上面代码我们可以看到,当宗门发布任务后,订阅的弟子(观察者们)都会收到任务最新通知。
看到这里,不知道你可以理解观察者模式了?
小包再给举个栗子: 比如你要应聘阿里巴巴的前端工程师,结果阿里巴巴 HR 告诉你没坑位了,留下你的电话,等有坑位联系你。于是,你美滋滋的留下了联系方式。殊不知,HR 已经留下了好多联系方式。好在 2022 年 2 月 30 号那天,阿里巴巴有了前端工程师的坑位,HR 挨着给留下的联系方式联系了一通。
案例中阿里巴巴就是目标对象 Subject ,联系方式列表就是用来维护观察者的 observerList ,根据前端职位的有无来调用 notify 方法。
# 发布订阅模式
所谓发布订阅模式,是在观察者基础上,在发布者和订阅者之间添加了一个中间层,这个中间者就是发布者与订阅者之间的联系的桥梁
- 发布者:满足条件时,通过消息中心发布消息
- 消息中心:负责存储消息与订阅者的对应关系,有消息触发时,负责通知订阅者 [ 中转站 ]
- 订阅者:去消息中心订阅自己感兴趣的消息
        // 把订阅发布功能封装成一个对象
         let event = {
            clientList:[],
            // 订阅消息
            listen:function (key,fn) {
                console.log(this,'this');
                if(!this.clientList[key]) {
                    this.clientList[key] = []
                }
                this.clientList[key].push(fn)
            },
            // 发布消息
            trigger:function () {
                var key = Array.prototype.shift.call(arguments)
                fns = this.clientList[key]
                if(!fns || fns.lenght == 0 ){
                    return false
                }
                for (var i = 0;i < fns.length; i++ ){
                    console.log(arguments,'arguments');
                    fns[i].apply(this,arguments)
                }
            },
            // 取消订阅
            remove:function(key,fn){
                var fns = this.clientList[key]
                if(!fns) return false
                if(!fn){ fns && (fns.length = 0) }
                else {
                    for(var l = fns.lenght -1;l>=0;l--){
                        var _fn = fns[l]
                        if(_fn===fn) fns.splice(l,1)
                    }
                }
            }

         }

         let obj = {}
         // 新对象可通过installEvent 便可以把发布订阅的方法,添加到自己身上
         let installEvent = function (obj) {
                for (var i in event){
                    obj[i] = event[i]
                }
         }
         installEvent(obj)
         // 订阅square50的消息(50平方的价格动态信息),回调函数接收发布者,发布的价格数据
         obj.listen('square50',(price)=>{
                console.log('square50   ',price);
         })

         obj.listen('square100',(price)=>{
                console.log('square100   ',price);
         })

         // 发布者:发布相关订阅频道所需数据给订阅者

         obj.trigger('square50',100000)
2
3
4
5
6
7
8
9
10
11
12
13
14
15
16
17
18
19
20
21
22
23
24
25
26
27
28
29
30
31
32
33
34
35
36
37
38
39
40
41
42
43
44
45
46
47
48
49
50
51
52
53
54
55
56
57
58
# 单例模式
单例模式定义:保证一个类仅有一个实力,并且提供一个访问他的全局访问点。
单例模式是一种常见的设计模式,有一些对象我们往往只需要一个,比如线程池、全局缓存、浏览器中的window对象等等。
在javascript开发中,单例模式的用途非常广泛。试想一下,当我们单机登录按钮的时候,页面中会出现一个登录浮窗,而这个登录浮窗是唯一的,无论单机多少次登录按钮,这个浮窗都只会被穿件一次,name这个登录浮窗就适合用单例模式来创建。
      // -------不安全-----------------------------
      var _unique = null;

      function createSingle() {
        var obj = {
          a: 1,
        };
        if (_unique === null) {
          _unique = obj;
        }
        return _unique;
      }

      var a = createSingle();
      //   _unique = null--不安全
      var b = createSingle();

      console.log(a === b); //true

      // -------安全--------------------------------
      var createSingle2 = (function () {
        var _unique2 = null;
        function single() {
          return {
            a: 1,
          };
        }
        return function () {
          if (_unique2 === null) {
            _unique2 = single();
          }
          return _unique2;
        };
      })();

      var a2 = createSingle2();
      var b2 = createSingle2();
      console.log(a2 === b2); //true
2
3
4
5
6
7
8
9
10
11
12
13
14
15
16
17
18
19
20
21
22
23
24
25
26
27
28
29
30
31
32
33
34
35
36
37
38
39
# 用代理实现单例模式 (★ 重点)
var CreateDiv = function (html) {
    this.html = html;
    this.init()
}

CreateDiv.prototype.init = function(){
    var div = document.createElement('div')
    div.innerHTML = this.html;
    document.body.appendChild(div)
}

// 引入代理类proxySingletonCreateDiv( 负责管理单例模式的逻辑类 )
var ProxySingletonCreateDiv = (function(){
    var instance;
    return function (html){
        if(!instance){
            instance = new CreateDiv(html)
        }
        return instance
    }
})();


var a = new ProxySingletonCreateDiv('sven1')
var b = new ProxySingletonCreateDiv('sven2')

alert(a===b) // true
2
3
4
5
6
7
8
9
10
11
12
13
14
15
16
17
18
19
20
21
22
23
24
25
26
27
# 通用的惰性单例
我们把创建实例对象的职责、管理单例的职责分别放在两个方法
    var getSingle = function(fn){
        var result;
        return function () {
            console.log(this,'this'); // window 由于最后执行getSingle - return出去的函数的作用域是在window下
            console.log(arguments,'arguments') // 1,2
            return result || ( resule = fn.apply(this,arguments))
        }
    }

    var createLoginLayer = function () {
        var div = document.createElement('div')
        div.innerHTML = '我是登录弹窗'
        div.style.display = 'none'
        document.body.appendChild(div)
        return div
    }

    var createSingleLoginLayer = getSingle(createLoginLayer)
    document.getElementById('loginBtn').onclick = function () {
        console.log(this,'this1');
        var loginLayer = createSingleLoginLayer(1,2);
        loginLayer.style.display = 'block'

    }
2
3
4
5
6
7
8
9
10
11
12
13
14
15
16
17
18
19
20
21
22
23
24
25
# 策略模式
策略模式是一种行为设计模式,定义一系列算法,将每一个算法封装起来,并让它们可以相互替换。策略模式让算法独立于使用它的客户而变化,也称为政策模式(Policy)。
假如正在开发一个在线商城的项目,每个产品都有原价,称之为 originalPrice。但实际上并非所有产品都以原价出售,可能会推出允许以折扣价出售商品的促销活动。
商家可以在后台为产品设置不同的状态,然后实际售价将根据产品状态和原价动态调整。
具体规则如下:
- 部分产品已预售:为鼓励客户预订,将在原价基础上享受
20%的折扣。 - 部分产品处于正常促销阶段:如果原价低于或等于
100,则以10%的折扣出售;如果原价高于100,则减10元。 - 有些产品没有任何促销活动:它们属于
default状态,并以原价出售。
这时需要写一个获取商品价格的函数 getPrice ,应该怎么写呢?
function getPrice(originalPrice, status) {
    // ...
    // 返回价格;
}
2
3
4
事实上,面对这样的问题,如果不考虑任何设计模式,最直观的写法可能 if-else 多次条件判断语句来计算价格。
有三种状态,可以快速编写如下代码:
function getPrice(originalPrice, status) {
    if (status === "pre-sale") {
        return originalPrice * 0.8;
    }

    if (status === "promotion") {
        if (origialPrice <= 100) {
            return origialPrice * 0.9;
        } else {
            return originalPrice - 20;
        }
    }

    if (status === "default") {
        return originalPrice;
    }
}
2
3
4
5
6
7
8
9
10
11
12
13
14
15
16
17
有三个条件,上面的代码写了三个 if 语句,这是非常直观的代码,但是这段代码组织上不好。
首先,它违反了单一职责原则(Single responsibility principle,规定每个类或者函数都应该有一个单一的功能,并且该功能应该由这个类或者函数完全封装起来)。函数 getPrice 做了太多的事情,这个函数不易阅读,也容易出现 bug 。如果一个条件出现 bug ,整个函数就会崩溃。同时,这样的代码也不容易调试。
并且这段代码很难应对变化的需求,这时就需要考虑设计模式,其往往会在业务逻辑发生变化时展现出它的魅力。
假设业务扩大了,现在还有另一个折扣促销:黑色星期五。折扣规则如下:
- 价格低于或等于 100 元的产品以 20% 的折扣出售。
- 价格高于 100 元但低于 200 元的产品将减少 20 元。
- 价格高于或等于 200 元的产品将减少 20 元。
这个时候该怎么扩展 getPrice 函数呢?
看起来必须在 getPrice 函数中添加一个条件语句:
function getPrice(originalPrice, status) {
    if (status === "pre-sale") {
        return originalPrice * 0.8;
    }

    if (status === "promotion") {
        if (origialPrice <= 100) {
            return origialPrice * 0.9;
        } else {
            return originalPrice - 20;
        }
    }
    // 黑色星期五规则
    if (status === "black-friday") {
        if (origialPrice >= 100 && originalPrice < 200) {
            return origialPrice - 20;
        } else if (originalPrice >= 200) {
            return originalPrice - 50;
        } else {
            return originalPrice * 0.8;
        }
    }

    if (status === "default") {
        return originalPrice;
    }
}
2
3
4
5
6
7
8
9
10
11
12
13
14
15
16
17
18
19
20
21
22
23
24
25
26
27
每当增加或减少折扣时,都需要更改函数。这种做法违反了开闭原则(对扩展开放,对修改关闭)。修改已有的功能很容易出现新的错误,而且还会使得 getPrice 越来越臃肿。
那么如何优化这段代码呢?
首先,可以拆分这个函数 getPrice 以减少臃肿。
/**
 * 预售商品价格规则
 * @param {*} origialPrice
 * @returns
 */
function preSalePrice(origialPrice) {
    return originalPrice * 0.8;
}
/**
 * 促销商品价格规则
 * @param {*} origialPrice
 * @returns
 */
function promotionPrice(origialPrice) {
    if (origialPrice <= 100) {
        return origialPrice * 0.9;
    } else {
        return originalPrice - 20;
    }
}
/**
 * 黑色星期五促销规则
 * @param {*} origialPrice
 * @returns
 */
function blackFridayPrice(origialPrice) {
    if (origialPrice >= 100 && originalPrice < 200) {
        return origialPrice - 20;
    } else if (originalPrice >= 200) {
        return originalPrice - 50;
    } else {
        return originalPrice * 0.8;
    }
}
/**
 * 默认商品价格
 * @param {*} origialPrice
 * @returns
 */
function defaultPrice(origialPrice) {
    return origialPrice;
}

function getPrice(originalPrice, status) {
    if (status === "pre-sale") {
        return preSalePrice(originalPrice);
    }

    if (status === "promotion") {
        return promotionPrice(originalPrice);
    }

    if (status === "black-friday") {
        return blackFridayPrice(originalPrice);
    }

    if (status === "default") {
        return defaultPrice(originalPrice);
    }
}
复制代码
2
3
4
5
6
7
8
9
10
11
12
13
14
15
16
17
18
19
20
21
22
23
24
25
26
27
28
29
30
31
32
33
34
35
36
37
38
39
40
41
42
43
44
45
46
47
48
49
50
51
52
53
54
55
56
57
58
59
60
61
经过这次修改,虽然代码行数增加了,但是可读性有了明显的提升。getPrice 函数显然没有那么臃肿,写单元测试也比较方便。
但是上面的改动并没有解决根本的问题:代码还是充满了 if-else ,而且当增加或者减少折扣规则的时候,仍然需要修改 getPrice。
其实使用这些 if-else 的目的就是为了对应状态和折扣策略。
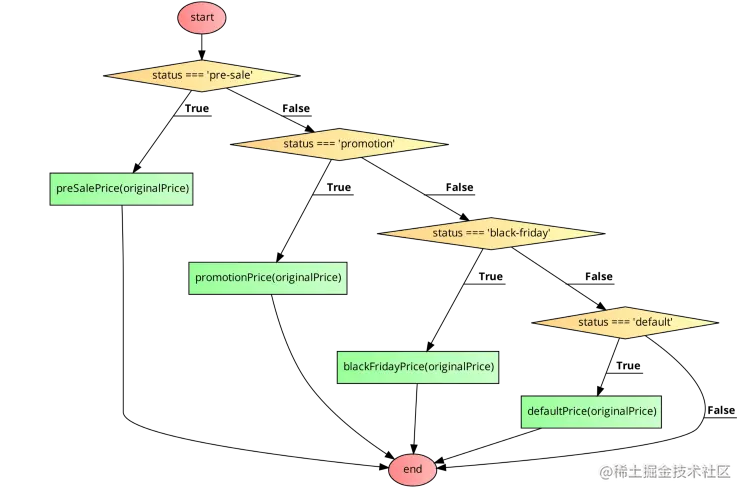
从图中可以发现,这个逻辑本质上是一种映射关系:产品状态与折扣策略的映射关系。
可以使用映射而不是冗长的 if-else 来存储映射,按照这个思路可以构造一个价格策略的映射关系(策略名称与其处理函数之间的映射),如下:
const priceStrategies = {
    "pre-sale": preSalePrice,
    promotion: promotionPrice,
    "black-friday": blackFridayPrice,
    default: defaultPrice,
};
复制代码
2
3
4
5
6
7
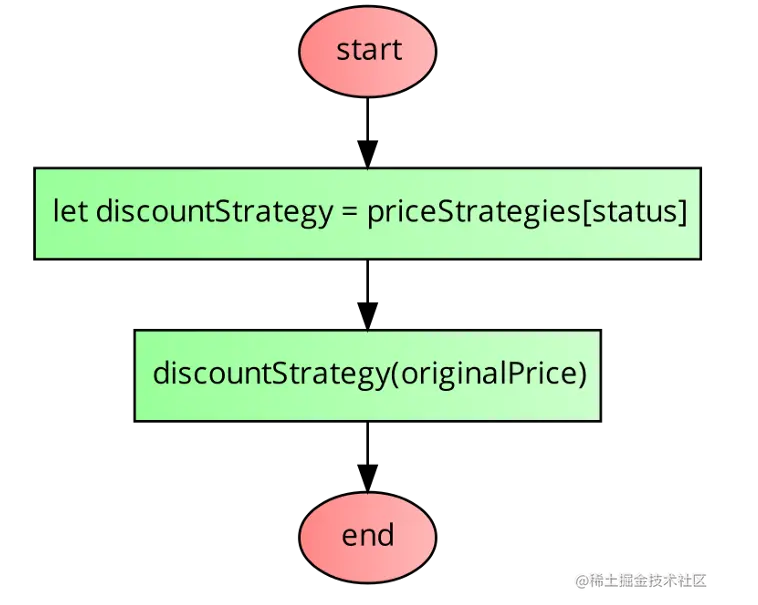
将状态与折扣策略结合起来,价格函数就可以优化成如下:
function getPrice(originalPrice, status) {
    return priceStrategies[status](originalPrice);
}
复制代码
2
3
4
这时候如果需要加减折扣策略,不需要修改函数,只需要修改价格策略映射关系 priceStrategies
之前的代码逻辑如下:
优化后的代码逻辑如下:
以上的优化策略就是使用了设计模式之策略模式,在实际的项目开发过程中还是比较实用。
在什么情况下可以考虑使用策略模式呢?如果函数具有以下特征:
- 判断条件很多
- 各个判断条件下的代码相互独立
然后可以将每个判断条件下的代码封装成一个独立的函数,然后建立判断条件和具体策略的映射关系。